If you’ve been following my recent posts and videos, you’ve probably noticed that I’ve been diving deep into anything related to the Xbox. My main focus lately has been creating content specifically for owners of hardmodded systems – whether modchip-installed or TSOP-flashed – who want to bring their older consoles up to modern 2026 standards using Cerbios 3.x.
This post and video continue the same trend. My goal is simple: I want to help you get the most out of the latest Cerbios update on your Xbox, unlocking new features, improving stability, and enjoying it like a modern console – all without soldering or doing complicated repairs.
So why am I mentioning IMGC images?
While researching material for previous blogs and videos, a hard disk build created by ToniHC caught my attention – the Dragon Loaded 2024 Edition 500GB hard disk image, which I stumbled upon while looking for something entirely different on Arcade Punks.
The build is distributed as an IMGC image and for those unfamiliar, it is a pre-built hard drive image – essentially a complete snapshot of an Xbox hard disk including dashboards, emulators, applications, and partition structure – packaged into a single .IMGC file.
Why was IMGC used?
Instead of manually copying files – which in the case of emulators can mean thousands of small files – an IMGC image is distributed as one single file. You write that entire image directly to a hard drive to recreate the system exactly as configured by the creator.
It is effectively a mirror image of the original installation, with the added benefit that it was compressed during creation. The C in IMGC stands for compressed, similar to how ZIP or RAR archives reduce file size for easier distribution.
So.. What Are the Challenges?
Because this image, and others like it, have been circulating online in .IMGC format for some time, they present two common issues:
- Not everyone knows how to properly restore an .IMGC image
- Most circulating disc builds were not created with Cerbios 3.x in mind
The good news?
It takes a bit of tinkering, but it is very easy once you know what to do. This post and the accompanying video will walk through everything step-by-step:
- What an .IMGC file actually is
- How to write it properly to a fresh hard drive
- How to edit older builds to make them compatible with Cerbios 3.x
As always, my content is intended to be educational. While there is a public listing on Arcade Punks, builds like this often spread across torrent sites, which I will not reference, as distribution of full images can sit in a legal grey area – and that is not the focus here.
Writing an .IMGC File to a Hard Disk
So, what is an .IMGC file?
An .IMGC file is a compressed hard drive image of any type of hard disk. In the case of the Dragon Loaded build, it uses a proprietary file system called FATX, which contains C, E, and F partitions as a complete mirror image of the creator’s original setup.
To make this a little easier to understand, it is similar to how an ISO file is a mirror image of disc media that you would burn to a blank disk. In this case, you are writing the IMGC to a new hard drive, including the entire Xbox filesystem structure.
To write the IMGC to a hard drive, you will need to either connect the target drive directly internally to your PC using SATA data and power connectors, or use a hard disk docking station compatible with your PC or laptop.
If you choose to use an external HDD docking station, make sure it includes its own dedicated power supply. Simple USB adapters or dongles that draw power only from the USB port are not sufficient for 3.5″ hard drives.
HDD Raw Copy v1.2
To write an original Xbox .IMGC image to a hard drive, you’ll need the right tooling. One of the most reliable options is HDD Raw Copy v1.2 – available at HDD Guru.
This tool allows you to:
- Write an original Xbox image captured in an .IMGC file directly to a hard drive
- Create your own (backup) .IMGC file
Using HDD Raw Copy, you can take a new or blank hard drive and write the entire “DRAGON Loaded 500GB Emulation Edition 2024.imgc” example image, reproducing the full Xbox filesystem exactly as it was captured. Once the write is complete, the hard drive is ready.
Well, “ready” in the sense that it can now be installed in an older modded Xbox – but since it was created before Cerbios 3.x existed, the image will need some attention to clean it up. More on that later.
Raw Copy can also be used to create a backup of your hard drive after updating it to be compatible with Cerbios 3.x, and it can also be used to make a safety backup of any Xbox hard drive if you want to preserve those as a full ready-to-restore image.
Writing the .IMGC to a Fresh Hard Drive
IMPORTANT NOTE
If you do not have a working DVD drive or a FATXplorer license, do not start the RawCopy process on the hard disk that is currently installed in your Xbox if it is your only working drive running Cerbios.
For more info read the full “Edit an Old Disk to Work with Cerbios v3.x” section!
Writing the .IMGC to a Fresh Hard Drive:
- Download and install RawCopy v1.2 from HDD Guru.
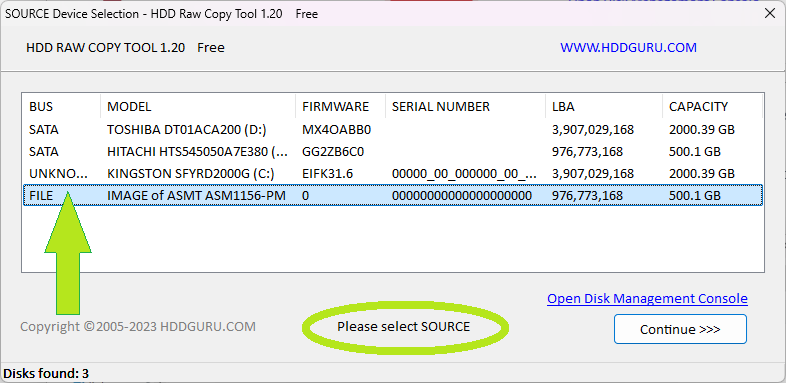
- Start RawCopy. When the main window opens, look for the prompt at the bottom that says “Please Select Source.”
- Select the IMGC file. Double-click on the file line in the source box (as shown in the screenshot) and navigate to the location of your .IMGC image.
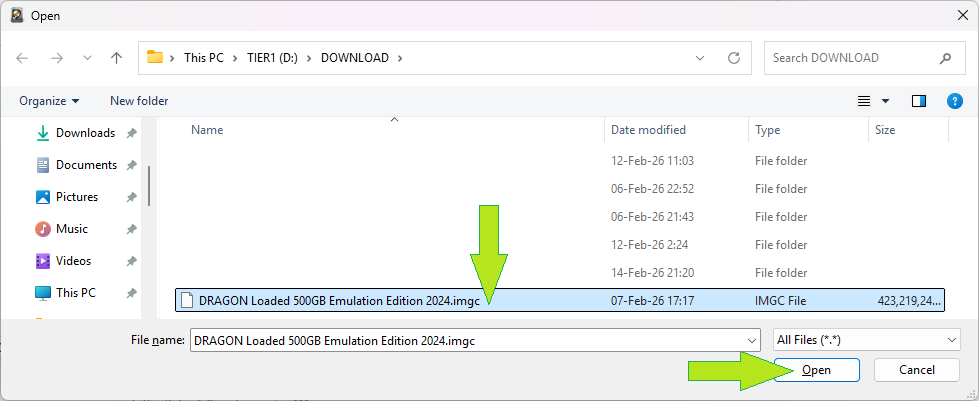
- Locate the IMGC on your PC. In the pop-up window, navigate to the folder where you keep the IMGC file on your PC or laptop, and select it.
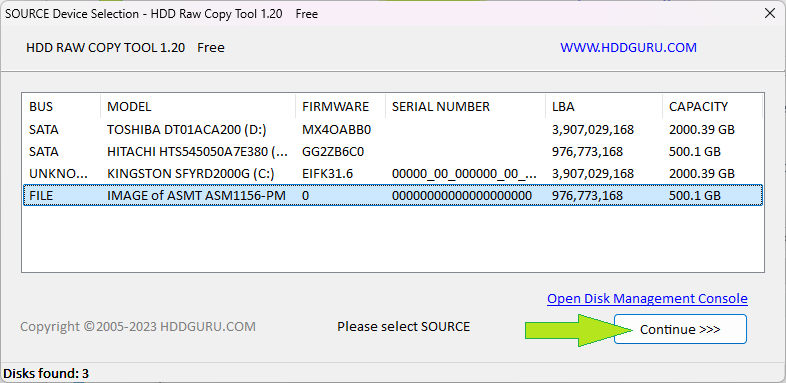
- Return to the main screen and continue. When the pop-up returns to the main RawCopy window, click Continue to move on.
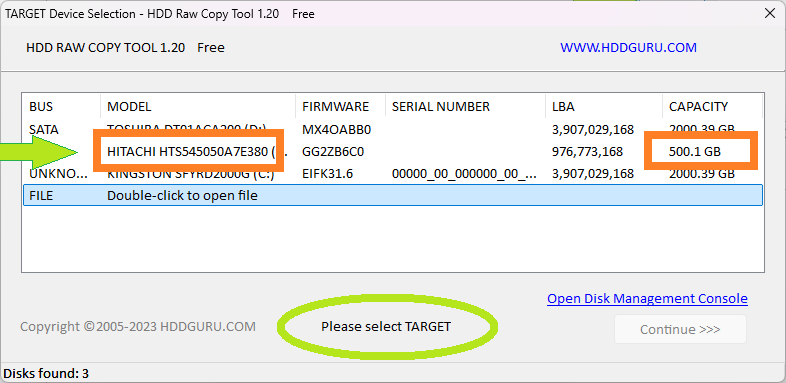
- Select the destination hard drive. When asked to “Please Select Target,” choose the hard drive you want to write the image to.
- Verify your selection. Make absolutely sure you select the correct drive by checking the capacity and description fields (matching the label on the physical disk). Do this with extreme care, as choosing the incorrect target will overwrite all data on the selected drive!
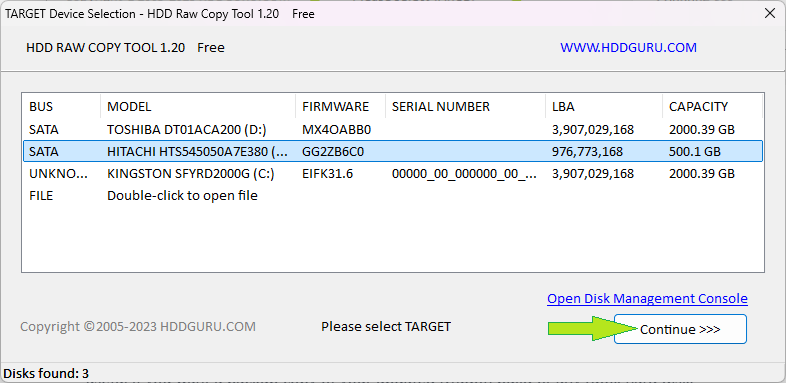
- Once you have triple-checked the target drive, click Continue to begin writing the image.
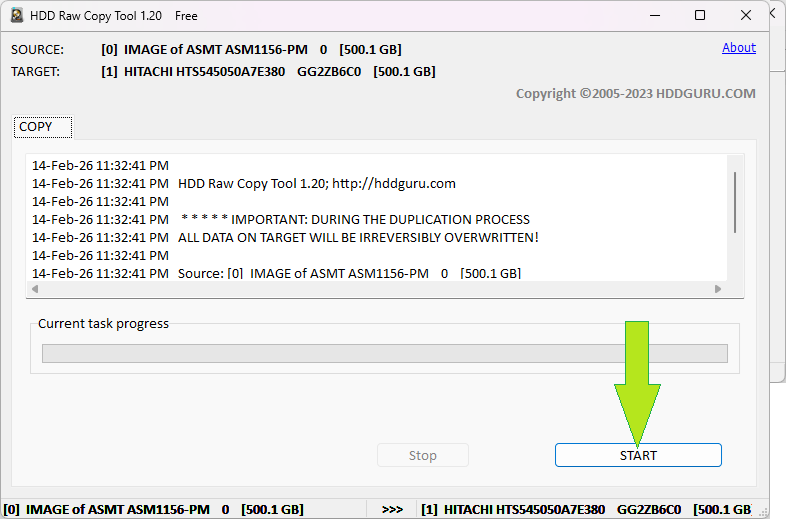
- Start the write process. Click Start to begin writing the image, and “Yes” to the pop-up warning. The time needed depends on the size of the IMGC and the speed of your source and target drive.
Note: The screenshots below showing the image writing process are from a different hard drive.
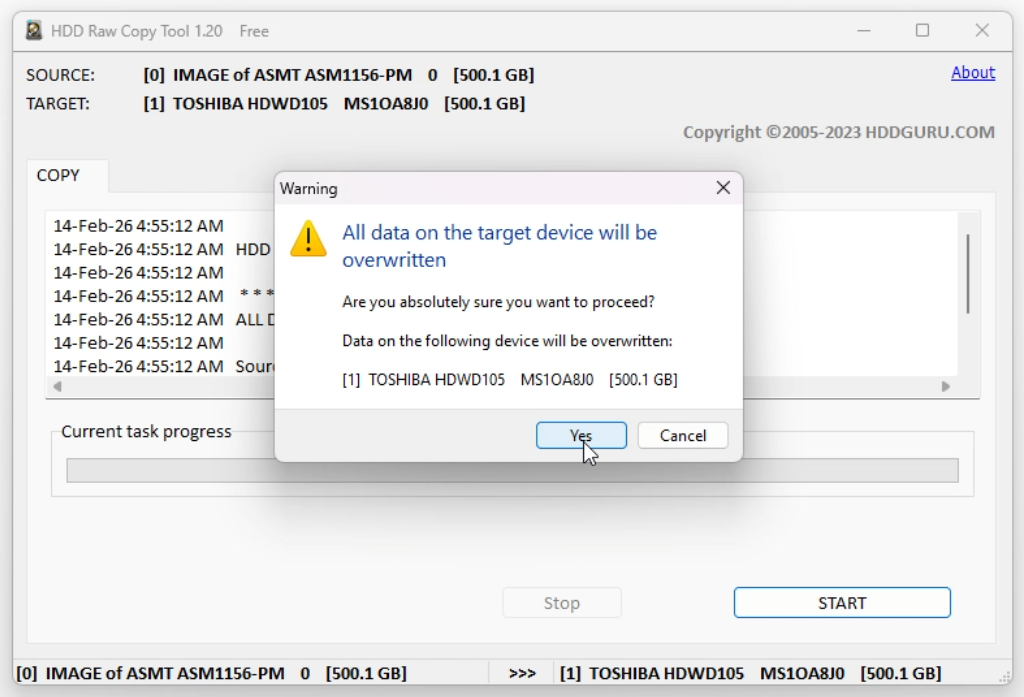
- Confirm and start. In the final warning (it’s always better to check one time too many than not enough), click Yes to start the writing procedure.
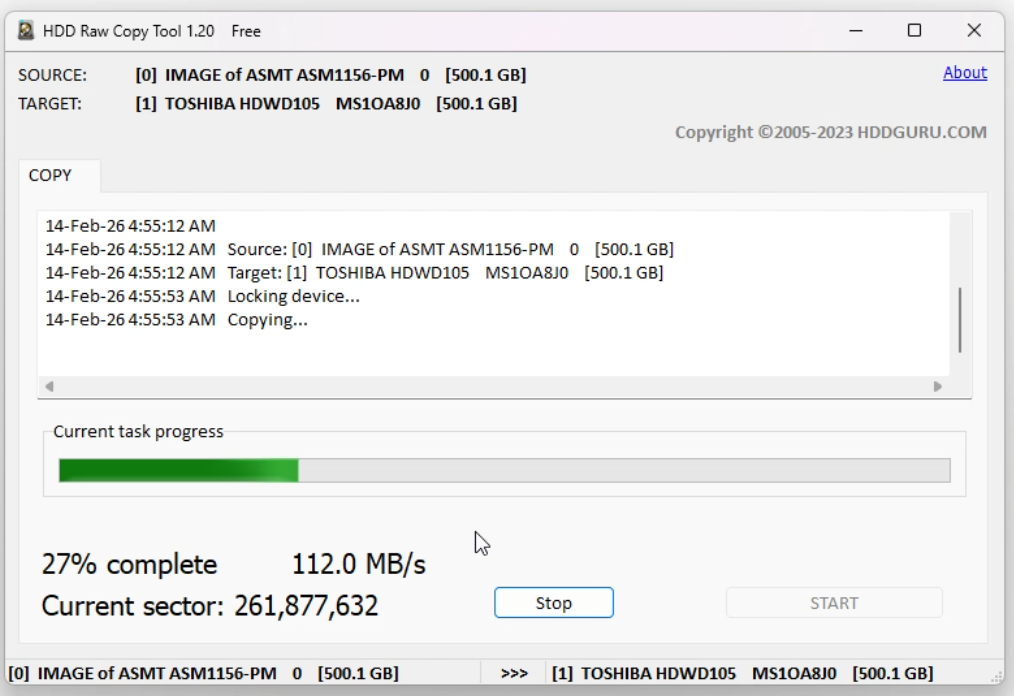
- Wait until completion. RawCopy will show a progress bar. Once finished, the hard drive is written and a mirror of the original.
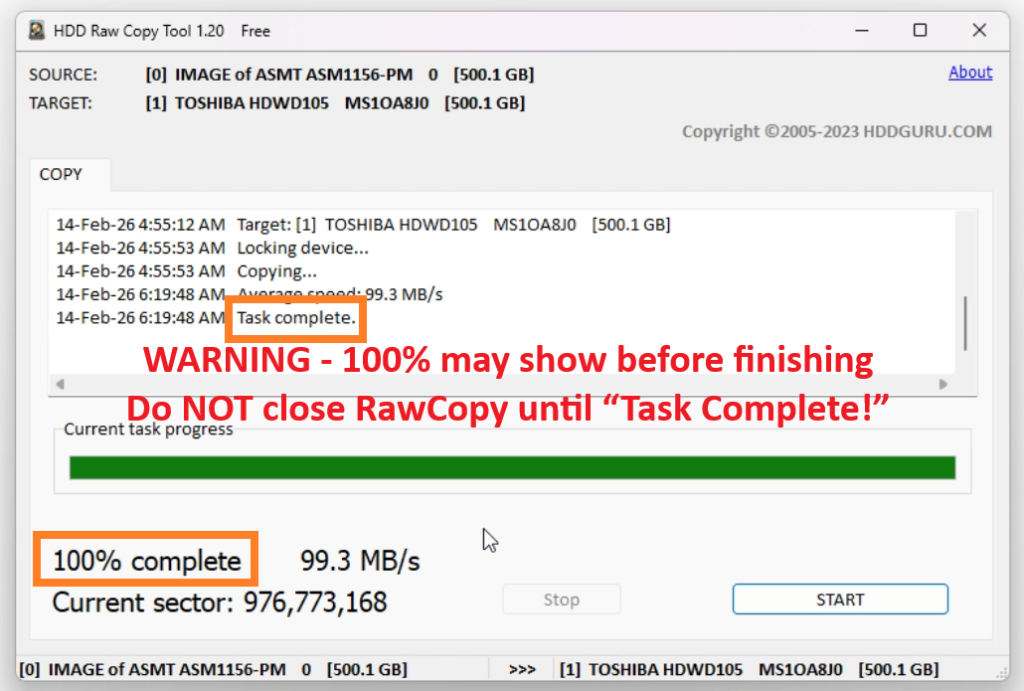
- Do not close RawCopy until the task is fully complete. The progress bar may show 100% before the final steps are finished, so absolutely wait for the “Task Complete!” message before closing the program.
Optional – Creating a Backup
As mentioned, RawCopy can also easily create a backup of any hard disk you want to make an image of. The procedure is identical to the step-by-step guide above, with one key difference: instead of starting from an .IMGC file as your source, you start with the hard disk itself as the source.
Be sure to pay careful attention to which drive you are selecting as the source. Make absolutely sure to select the FILE option and NOT one of the hard disks in the “Please Select Target” area!
Once you have chosen the file option, RawCopy will prompt you to pick a destination on your computer where you want to save the new .IMGC file.
The same warning applies here – be extremely careful when selecting a target!
Edit an Old Disk to Work with Cerbios v3.x
Now that we have written the .IMGC file to a hard disk, the real challenge begins – especially for users who are already running Cerbios v3.x (at the time of writing, I am working with v3.1).
Starting with Cerbios 3.0, the BIOS uses the *E:* drive to store its configuration and provide access to advanced settings and recovery functionality. When mounting older hard disk images onto a Cerbios 3.x modded Xbox, the issue becomes clear:
These images were created before Cerbios 3.x existed and therefore do not include the required E:\Cerbios folder. That folder contains the essential cerbios.ini configuration file, which defines boot instructions and feature settings, as well as the Cerbios recovery components.
Without it, Cerbios cannot load its configuration properly. Attempting to boot normally or in safe mode will result in the Xbox hanging on a black screen. The good news is that fixing this is very straightforward – and there are three ways we can move forward:
- Editing the image directly on the Xbox while running Cerbios v3.x
- Editing the image on a PC using FATXplorer (licensed method)
- Editing the image on the Xbox while temporarily running an older BIOS
I will cover each method below so you can choose the variant that works best for your setup.
Option 1 – Directly on the Xbox while running Cerbios v3.x
For this method, you will need a working DVD drive in your Xbox. If your current system does not have one installed, you can temporarily swap in a drive from another Xbox or borrow one from a friend – you only need it briefly, as we just need it to work once in order to boot a HeXEn disc.
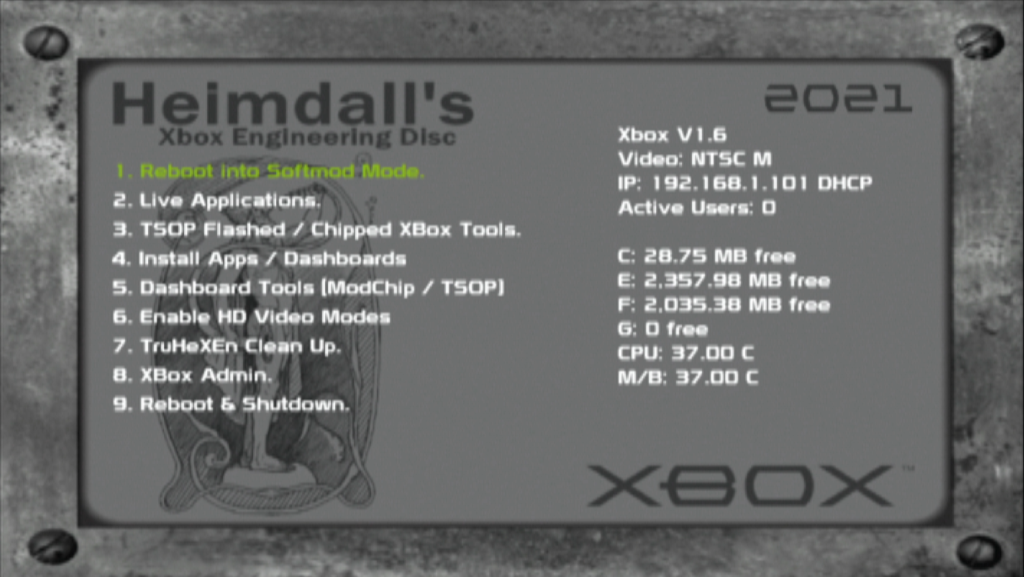
You will also need to burn a copy of HeXEn to DVD.
Various versions are available on the Internet Archive, and almost any version will work for our purposes. We only need it to boot successfully so we can enable the FTP server and transfer the required Cerbios folder from your PC or laptop to the Xbox.
Using HeXen to bypass the hard disk
Use the eject button to insert the HeXEn disc.
Power the Xbox off and back on so it attempts to boot from the DVD instead of the hard disk.
This may require one or two attempts. Keep in mind that booting a HeXEn disc can take some time, and during the initial loading phase the screen may not change at all. Be patient and allow up to 2-3 minutes before assuming it has failed. If it does not load after that time, power cycle and try again.
What you are effectively doing here is forcing the Xbox to prioritize booting from the DVD drive before it reads the E:\ drive for its Cerbios configuration. The system may attempt different boot paths, and we want the one that loads the HeXEn disc rather than the hard disk.
With HeXEn loaded, the Xbox should automatically obtain a DHCP IP address and have its FTP server enabled. From this point, connect via FTP from your PC or laptop and transfer your Cerbios folder – including the cerbios.ini file and recovery menu – to the root of the Xbox E drive so that it exists as:
E:\Cerbios
Once the FTP transfer has completed, remove the HeXEn disc and power down the Xbox. If you borrowed a DVD drive, you can now return it – it will not be needed again from this point.
Depending on how your Cerbios boot path is currently configured, the Dragon hard disk may already boot correctly if your cerbios.ini is set by default to launch C:\evoxdash.xbe.
However, if your cerbios.ini is pointing to a dashboard from a different hard disk – such as E:\XBMC4Gamers\default.xbe – Cerbios will not find those files.
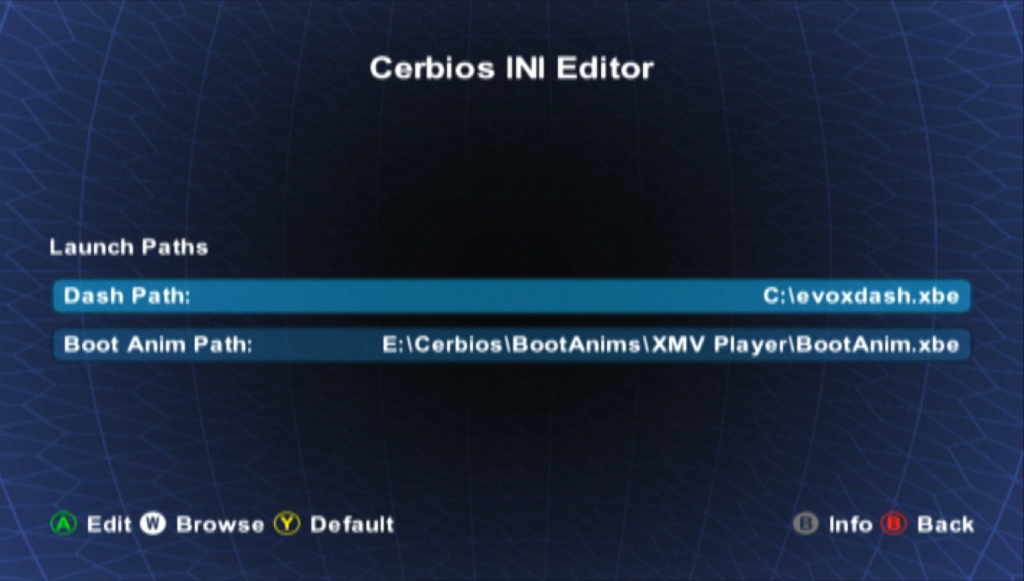
Do not worry. Since we just transferred the Cerbios recovery menu, it will now load instead. From there, open the Cerbios INI Editor and manually adjust the launch path to:
C:\evoxdash.xbe
Save the changes, reboot the Xbox, and congratulations the Dragon IMGC (or any other .IMGC based hard disk for that matter) should now boot properly under Cerbios v3.x.
Option 2 – Using FATXplorer (licensed method)
It is no secret that since returning to the Xbox scene, I have become a huge fan of FATXplorer. It took me a little while to get back into things, so when Harcroft recommended I check it out, it quickly became clear that this tool represents a massive step forward in modern tooling for the original Xbox.
As you guys know, I have highlighted Eaton’s excellent work and the powerful free features of FATXplorer in previous posts and videos. However, this is a perfect example of where the licensed version can truly save the day if you own a license.
Unlike the free version, the full version of FATXplorer allows you to mount and access your Xbox hard disk directly from your PC or laptop, treating it like any other connected drive – as long as it is attached via SATA or through a properly powered external docking station.
So, how does this help in our case?
You might think – sure BeepFixer, I understand it is useful for transferring large game libraries, but the Dragon image is already fully loaded. And you would be right. However, we can still use the mount feature to directly edit the E partition.
The steps are very simple:
- Mount the E partition
- Copy the Cerbios folder to the root of the partition
- Open the cerbios.ini file in Notepad, just like you would with any normal PC drive
- If needed, change the line to:
DashPath = C:\evoxdash.xbe - Save the cerbios.ini file
- Safely unmount the drive
And that is it, problem solved – the old disk image is now fully Cerbios compatible.
On its own, this may not be enough reason to purchase a license – that is something you can decide for yourself. However, if you were already considering getting a license to transfer games, movies, or other content across large SATA drives up to 16TB, then this is another strong reason to do so.
And yes – I am clearly a fan, but to be transparent, I am not promoting FATXplorer through affiliate links or sponsorship! I purchased my own license because, for me, it is absolutely worth it. You can find it here: https://fatxplorer.eaton-works.com/
Option 3 – Temporarily running an older BIOS
For those of you who do not have a working DVD drive and cannot justify purchasing a FATXplorer license just to copy over the Cerbios folder, I spent some time thinking about an alternative approach that would still allow us to move forward.
IMPORTANT NOTE
If you do not have a working DVD drive or a FATXplorer license, do not start the RawCopy process on the hard disk that is currently installed in your Xbox if it is your only working drive running Cerbios.
So, chances are at some point, you likely followed my guide or video on how to flash your BIOS with Cerbios v3.0 or v3.1. Using that same procedure, we can temporarily step down and flash an older BIOS version that is compatible with pre-Cerbios 3.x hard disk images.
The free method – Flashing back to an older BIOS
While this is not as clean or convenient as the previous two methods, temporarily flashing back to an older BIOS is a viable workaround. It does require more tinkering, but it allows you to boot older .IMGC images without needing a DVD drive or a FATXplorer license.
You will need:
- A compatible older BIOS (M8+, IND, etc. make sure it matches your motherboard revision)
- Pandora Tool v2 by Team Resurgent (if you need to download a BIOS)
- Xblast OS V0.56 to flash the BIOS
- Your Cerbios v3.x BIOS file to flash back once finished
I won’t go into full step-by-step flashing instructions here, as that would be a complete tutorial on its own. You can, for example, refer to my modchip update video above to see the flashing procedure in action.
However, keep in mind that in this method we will be swapping both hard disks and BIOS versions multiple times, so you must either:
- Recommended:
Have a spare hard disk already running Cerbios, for example remember your original 8GB stock drive that seemed useless when you upgraded to a 500GB – grin yeah that would come in handy now. - Not recommended
Flash back to the older BIOS before overwriting your only working Cerbios drive with the Dragon .IMGC image. I mean it is doable, but I would not leave yourself without a working Cerbios setup.
if you absolutely must go this route then hey – make an .IMGC file first perhaps of the working disk before you overwrite perhaps if you have to use a single drive
Recommended BIOS
If you are stepping down temporarily, I recommend using a M8+ bios, just be careful to use the correct version as it comes in two variants:
- M8+ for v1.0 – 1.4 motherboards
- M8+ for v1.6 motherboards
Preparation
- If needed, use Pandora to download the correct BIOS from Xbins
- Ensure you have your Cerbios v3.x BIOS ready to flash back later
Using your Cerbios drive (Disk 1)
- Boot the Xbox using the hard disk currently running Cerbios (Disk 1).
- Install Xblast if it is not already installed.
- Flash the appropriate M8+ BIOS to the Xbox.
- Shut down the console once flashing is complete.
Using the Dragon drive (Disk 2)
- Swap Disk 1 for the Dragon hard disk (Disk 2).
- The Xbox should now boot using the M8+ BIOS.
- The Dragon setup uses
192.168.1.200for FTP (in my case). - Press the thumbstick in the games menu to display the IP address if needed.
- FTP into the Xbox and copy the Cerbios folder from your PC to the root of the E drive so it becomes available on the Xbox as E:\Cerbios
- Power down the Xbox once the transfer is complete.
Final Step – Return to Cerbios
- Reinstall Disk 1 (the Cerbios drive).
- Flash Cerbios v3.x back onto the Xbox.
- Swap back to the Dragon drive (Disk 2).
Of course, technically you do not have to flash Cerbios back if the Dragon-loaded hard disk will be the machine’s only purpose going forward. However, since you are already in the process of flashing and swapping, it is a small additional effort to restore Cerbios.
I personally would – that way, you keep the system flexible, If in a few years you decide to install another hard disk – perhaps when 16TB drives cost about as much as a soda can – your console will already be properly configured.
Final Thoughts
While this article uses the Dragon Loaded 500GB image as an example – simply because I stumbled across it and thought it would make a great, tangible case study – the logic explained here applies to all kinds of .IMGC files, build images, or even just swapping back to older hard disks in general.
And if you ever needed a golden excuse to justify keeping that original 8GB stock drive you once upgraded from, I can proudly say: you are very welcome, my friend. Us hoarders need to stick together for those rare and glorious moments when we turn out to be absolutely right.
In many ways, we are fortunate that the original Xbox was built on PC-based technology. It has made it far easier to work around hardware failures like worn-out DVD drives compared to consoles such as the PlayStation 1.
Even as the modding scene evolves, solutions like this continue to exist – and that is something I genuinely appreciate. I know .IMGC files are a fairly niche topic, but I hope this post was helpful, or at the very least an interesting deep dive into what is possible.
See you in the next post or video.
BeepFixer signing off